
[Kotlin] 스터디 Kotlin coroutine: Deep Dive 1~5장
1~5장(1부) 에 해당하는 내용입니다.
5장은 생략합니다.
1장. 왜 배워야 하는가
안드로이드의 경우, 메인 스레드에서 많은 일을 하게 되면 ANR 에러가 발생합니다. 코루틴 이전까지는 메인 스레드를 블록하지 않으면서 다양한 요구사항을 만족하기 위하여 아래 방식들을 사용해왔습니다.
- 스레드 전환
- Main 스레드 외에 블로킹이 가능한 새로운 스레드를 생성하여 작업하는 방법
fun onCreate() { thread { // something runOnUiThread { // 와 오랜만에 본다 // update UI } } }- 단점
- 스레드 생성 비용이 큼
- 스레드 중단 방법 부재로 인한 메모리 누수
- 전환이 잦아지면 복잡해짐
- 예상치 못한 동작 발생 가능성
- 콜백
- 논블로킹 방식으로, 호출이 끝났을 때 전달된 콜백을 수행하는 방식
fun onCreate() { doSomething { result -> // blabla.. // update UI } }- 단점
- 스레드와 마찬가지로 중단이 거의 불가능
- 여러 동작의 병렬 처리가 매우 힘듦
- 콜백 지옥에 빠질 수 있음 😇
-
Rx
- 스레드 전환과 동시성 처리를 지원하는 Reactive Stream 이용
fun onCreate() { disposables += doSomething() .subscribeOn() .observeOn() .subscribe { result -> // update UI } }- 단점
- 기존 코드 -> rx 적용 시 코드 변경점이 매우 많음
- 구현 복잡
코루틴은 위에 언급된 방법들의 단점을 커버합니다.
- 중단이라는 개념을 통해 스레드 블로킹하지 않기 때문에 효율적
- 스레드보다 현저히 적은 생성, 실행, 유지 비용
- 메모리 누수 X
- 기존 코드 -> 코루틴 코드 변경 사항 적음
- async, await 를 이용하여 쉬운 병렬 처리 가능
// getUser와 getNew를 동시에 호출하고 둘 다 완료될 때까지 기다리는 코드
fun fetchNews() {
  viewModelScope.launch {
      var user = async { getUser() }
      var news = async { getNews() }
      updateUI(user.await(), news.awat())
  }
}
이정도면 코루틴을 사용해야 하는 이유는 충분!
2장. 시퀀스 빌더
Sequence
- 값을 순차적으로 반환
- 계산은 필요할 때만. lazy 처리 ⇒ 연산 최소화
- 무한정이 될 수 있음
- 효율적인 메모리 사용 ⇒ 계산마다 중간 리스트 생성 X
sequence 빌더를 보면, 인자로 suspend SequenceScope
public fun <T> sequence(@BuilderInference block: suspend SequenceScope<T>.() -> Unit): Sequence<T> = Sequence { iterator(block) }

public inline fun <T> Sequence(crossinline iterator: () -> Iterator<T>): Sequence<T> = object : Sequence<T> {
    override fun iterator(): Iterator<T> = iterator()
}
헷갈릴 수 있는 부분
sequence 이용시, 이전에 중단된 위치 이후부터 값을 가져오고 싶은 경우에는 sequence.iterator() 로부터 반환된 iterator를 사용하여 접근해야 합니다.
아래 sequence.take(5).toList() 와 같이 사용하는 경우 sequence는 처음부터 수행됩니다.
val oddNumbers = sequence {
    yield(1)
    yieldAll(listOf(3, 5))
    yieldAll(generateSequence(7) { it + 2 })
}
println(oddNumbers.take(5).toList())
println(oddNumbers.take(3).toList())

val iterator = oddNumbers.iterator()
println(iterator.next())
println(iterator.next())

/// 출력
[1, 3, 5, 7, 9]
[1, 3, 5]
1
3
3장. 중단은 어떻게 작동할까?
중단 함수
- 중단 가능한,
suspend키워드가 붙은 함수 - 코루틴 또는 다른 중단 함수에 의해서만 호출 가능
Continuation
코루틴이 중단되었을 때 반환되는 객체로, 제네릭 타입의 값 또는 예외를 반환시켜 코루틴을 재개할 수 있습니다.
suspend fun main() {
	println("Before")
	suspendCoroutine<Unit>() { continuation ->
		println("Before too")
	}
	println("After")
}

/// 출력
Before
Before too
위 코드에서 suspendCoroutine() 에 전달된 람다함수는 바로 실행되어 Before too 까지 출력됩니다. suspendCoroutine 함수에 전달된 람다는 코루틴을 중단 시키기 전에 실행되기 때문입니다.
여기에 전달된 continuation 객체로 코루틴을 재개할 수 있습니다.
delay의 구현
생각보다 꽤 쓰이는 delay()는 어떻게 구현되어 있을까요? 스레드를 재우는 방식(블록시키는 방식)이 아니라 타이머를 설정하여 일정 시간 이후에 재개하는 방식을 사용합니다.
public suspend fun delay(timeMillis: Long) {
    if (timeMillis <= 0) return // don't delay
    return suspendCancellableCoroutine sc@ { cont: CancellableContinuation<Unit> ->
        // if timeMillis == Long.MAX_VALUE then just wait forever like awaitCancellation, don't schedule.
        if (timeMillis < Long.MAX_VALUE) {
            cont.context.delay.scheduleResumeAfterDelay(timeMillis, cont)
        }
    }
}
cont.context.delay는 Delay 라는 이름의 interface이고, 실제로 코루틴용 Executors 에 구현되어 있다.
internal class ExecutorCoroutineDispatcherImpl(override val executor: Executor) : ExecutorCoroutineDispatcher(), Delay {
위 Executor 코드를 살펴보면 객체의 목적 자체가 delay를 위한 것이라고 바로 느낄 수 있습니다. delay용 스레드를 지정해두고 사용하는 것이 다른 스레드는 블록하지 않아도 되기 때문에 훨씬 효율적인 방법입니다.
책에서 delay를 언급한 이유는, 중단 예제 코드에 delay를 이용했기 때문인 것으로 보입니다.
안드로이드
메인 스레드에서 동작하는 코루틴을 사용했을 때 ANR이 발생할까?
- 발생하지 않는다!
- 코루틴이 중단 되는 것이지 메인 스레드가 중단되는 것이 아니기 때문입니다.
CoroutineScope(Dispatchers.Main).launch {
            Timber.d("coroutine test1 ${Thread.currentThread()}")
            delay(5000)
            Timber.d("coroutine test2 ${Thread.currentThread()}")
        }

/// 출력
2023-12-20 17:28:01.644   MainActivity$onCreate   coroutine test1 Thread[main,5,main]
2023-12-20 17:28:06.647   MainActivity$onCreate   coroutine test2 Thread[main,5,main]
4장. 코루틴의 실제 구현
핵심은 Continuation 에 있습니다.
- Continuation 이 상태를 가지고 있는 상태 머신의 형태
- Continuation을 전달하고, 받은 Continuation 객체를 데코레이션하기 때문에
콜스택처럼 사용됨 (CPS - Continuation Passing Style)
즉, 중단 이후 재개 시점과 필요한 데이터를 저장하고 있어서 재개가 가능한 것입니다.
상태를 저장하는 Continuation
코루틴은 중단 이후 재개를 위해서 label 필드를 사용하여 재개 시점을 저장합니다.
처음 시작 시의 값은 0
fun main() = runBlocking {
    println(continuationTest1())
}

suspend fun continuationTest1(): String {
    println("Test1: Before")
    val mock1 = getMock1()
    val mock2 = getMock2(mock1)

    return "Test2: After, $mock2"
}

suspend fun getMock1(): Int {
    delay(1000)
    return 23
}

suspend fun getMock2(num: Int): String {
    delay(2000)
    return "Mock $num"
}
여기에서 실제로 중단 되는 부분을 찾아보겠습니다.
- continuationTest1
- suspend 키워드가 붙은 continuationTest1 진입, getMock1, getMock2 호출 시점 세 곳
- getMock1
- getMock1 진입, delay 호출 시점 두 곳
- getMock2
- getMock2 진입, delay 호출 시점 두 곳
이제 위 코틀린 코드가 변환된 자바 코드를 잠깐 확인해봅시다. (continuationTest1 함수)
   @Nullable
   public static final Object continuationTest1(@NotNull Continuation var0) {
      Object $continuation;
      label27: {
         if (var0 instanceof <undefinedtype>) {
            $continuation = (<undefinedtype>)var0;
            if ((((<undefinedtype>)$continuation).label & Integer.MIN_VALUE) != 0) {
               ((<undefinedtype>)$continuation).label -= Integer.MIN_VALUE;
               break label27;
            }
         }

         $continuation = new ContinuationImpl(var0) {
            // $FF: synthetic field
            Object result;
            int label;

            @Nullable
            public final Object invokeSuspend(@NotNull Object $result) {
               this.result = $result;
               this.label |= Integer.MIN_VALUE;
               return MainKt.continuationTest1(this);
            }
         };
      }

      Object var10000;
      label22: {
         Object $result = ((<undefinedtype>)$continuation).result;
         Object var5 = IntrinsicsKt.getCOROUTINE_SUSPENDED();
         switch(((<undefinedtype>)$continuation).label) {
         case 0:
            ResultKt.throwOnFailure($result);
            String var1 = "Test1: Before";
            System.out.println(var1);
            ((<undefinedtype>)$continuation).label = 1;
            var10000 = getMock1((Continuation)$continuation);
            if (var10000 == var5) {
               return var5;
            }
            break;
         case 1:
            ResultKt.throwOnFailure($result);
            var10000 = $result;
            break;
         case 2:
            ResultKt.throwOnFailure($result);
            var10000 = $result;
            break label22;
         default:
            throw new IllegalStateException("call to 'resume' before 'invoke' with coroutine");
         }

         int mock1 = ((Number)var10000).intValue();
         ((<undefinedtype>)$continuation).label = 2;
         var10000 = getMock2(mock1, (Continuation)$continuation);
         if (var10000 == var5) {
            return var5;
         }
      }

      String mock2 = (String)var10000;
      return "Test2: After, " + mock2;
   }
뭔가 어려우니 코틀린 코드로 핵심만 옮겨보면, 아래처럼 나타낼 수 있습니다.
class ContinuationTest1Continuation: ContinuationImpl {
	var cont: Continuation<Any?>? = null
	var label = 0

	var mock1Result: Int? = null
	var mock2Result: String? = null

	override fun invokeSuspend() {
		continuationTest1(this)
	}
}

suspend fun continuationTest1(cont: Continuation<Any?>): Any? {
	val sm = cont as? ContinuationTest1Continuation ?: ContinuationTest1Continuation() // state machine

	when(sm.label) {
		0 -> {
			sm.cont = cont
			sm.label = 1
			println("Test1: Before")
			sm.mock1Result = getMock1()
			return
		}
		1 -> {
			sm.label = 2
			sm.mock2Result = getMock2(sm.mock1Result)
			return
		}
		2 -> {
			println("Test1: After, ${sm.mock2Result}")
		}
	}
}
continuationTest1 함수 내부 동작이 switch-case문으로 변경되었고, 여기에서 label이 사용되고 있는 것을 확인할 수 있습니다.
label 은 0, 1, 2 총 세개이며, 각 label 별 동작이 위에서 중단되는 시점에 맞추어 구분된 것을 볼 수 있습니다.
label 외의 변경사항을 조금만 더 살펴봅시다.
- 인자가 없던 continuationTest1 함수에 Continuation 인자가 추가됨
- 코루틴을 재개하고자 할 때 continuation.invokeSuspend() 마지막 줄에서 continuationTest1(this) 를 호출하는 재귀 형식으로 동작을 재개합니다.
- 반환값이 String → Object(Any) 로 변경됨
- 함수 내에 코루틴이 중단되었음을 알려주는 값을 반환하는 코드가 포함되어있습니다. 이 때 반환 값은 Any 타입의
COROUTINE_SUSPENDED이기 때문입니다.
public val COROUTINE_SUSPENDED: Any get() = CoroutineSingletons.COROUTINE_SUSPENDED - 함수 내에 코루틴이 중단되었음을 알려주는 값을 반환하는 코드가 포함되어있습니다. 이 때 반환 값은 Any 타입의
- continuation 객체를 가짐
- 이 continuation 객체는 ContinuationImpl 익명 클래스로 생성되며 내부에 동작에 필요한 상태를 저장하고 있습니다.(result, label, 저장할 값이 있는 경우 다른 값들,,)
 $continuation = new ContinuationImpl(var0) {
          // $FF: synthetic field
          Object result;
          int label;

          @Nullable
          public final Object invokeSuspend(@NotNull Object $result) {
             this.result = $result;
             this.label |= Integer.MIN_VALUE;
             return MainKt.continuationTest1(this);
          }
       };
콜 스택의 역할을 하는 Continuation
함수들의 호출은 스택으로 관리됩니다.
코루틴이 중단되는 경우에는 스택의 정보가 사라지게 되므로 이전 상태로부터의 재개가 불가능해보입니다.
하지만 continuation에 중단 시점까지의 상태를 저장해두고 콜스택 처럼 사용하기 때문에 재개가 가능합니다.
continuation이 자신을 호출한 continuation을 참조하는 방식으로, 아래와 같은 구조가 됩니다.
CContinuation(
	..
	completion = BCoutinuation(
		..
		completion = ACoutinuation(
			..
		)
	)
)
Continuation을 상속받은 BaseContinuationImpl를 보면, 생성자에 completion: Continuation을 포함하고 있습니다.
completion은 현재 중단 함수를 호출한 중단 함수의 Continuation.
코루틴을 재개할 때 가지고 있는 completion을 타고타고 올라가면서 동작하며, 최상위 completion의 resumeWith을 호출하게 됩니다.
- BaseContinuationImpl
internal abstract class BaseContinuationImpl(
    // This is `public val` so that it is private on JVM and cannot be modified by untrusted code, yet
    // it has a public getter (since even untrusted code is allowed to inspect its call stack).
    public val completion: Continuation<Any?>?
): Continuation<Any?>, CoroutineStackFrame, Serializable {
		public final override fun resumeWith(result: Result<Any?>) {
        // This loop unrolls recursion in current.resumeWith(param) to make saner and shorter stack traces on resume
        var current = this
        var param = result
        while (true) {
            // Invoke "resume" debug probe on every resumed continuation, so that a debugging library infrastructure
            // can precisely track what part of suspended callstack was already resumed
            probeCoroutineResumed(current)
            with(current) {
                val completion = completion!! // fail fast when trying to resume continuation without completion
                val outcome: Result<Any?> =
                    try {
                        val outcome = invokeSuspend(param)  // 여기와
                        if (outcome === COROUTINE_SUSPENDED) return
                        Result.success(outcome)
                    } catch (exception: Throwable) {
                        Result.failure(exception)
                    }
                releaseIntercepted() // this state machine instance is terminating
                if (completion is BaseContinuationImpl) {
                    // unrolling recursion via loop
                    current = completion   // 여기와
                    param = outcome
                } else {
                    // top-level completion reached -- invoke and return
                    completion.resumeWith(outcome)  // 여기
                    return
                }
            }
        }
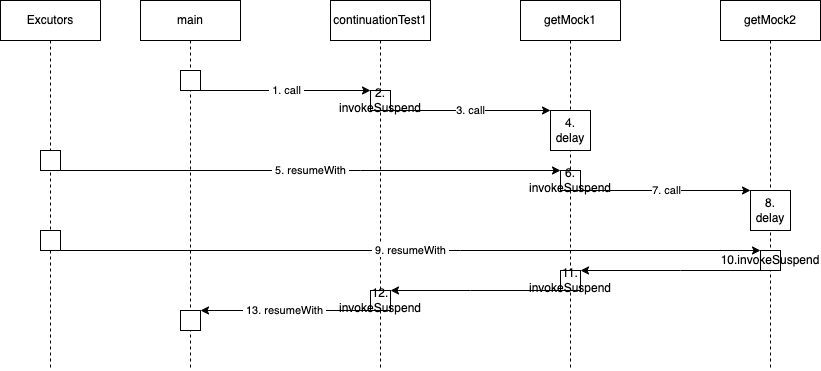
아까와는 조금 다른 예제로 동작을 확인해봅시다.
continuationTest1 에서 getMock1, getMock2를 호출했던 위 예제와는 달리,
아래에서는 continuationTest1 에서 getMock1을, getMock1에서 getMock2를 호출합니다.
fun main() = runBlocking {
    println(continuationTest1())
}

suspend fun continuationTest1(): String {
    println("Test1: Before")
    val mock1 = getMock1()

    return "Test2: After, $mock1"
}

suspend fun getMock1(): String {
    delay(1000)
    var mock2 = getMock2(23)
    return "겹겹 $mock2"
}

suspend fun getMock2(num: Int): String {
    delay(2000)
    return "Mock $num"
}
아래 순서대로 동작하게 됩니다.
getMock2(getMock1(continuationTest1.continuation).continuation)
Comments